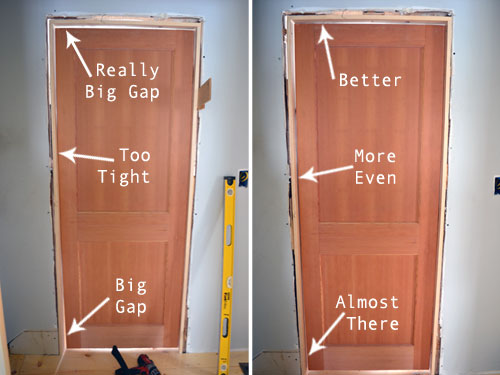
Sometimes the gap is far too wide.
Shim door hinges to adjust door.
When the door is pulled toward the closed position the nailset spreads the leaves and widens the gap.
Leave the middle hinge unattached while you make these adjustments.
Alternatively place a small book or wooden block under the corner of the door below the doorknob to hold the door up while you work with the hinges.
To use this technique remove a screw near the middle of the hinge rather than the top or bottom screw.
Continue tightening and checking until the door no longer sticks.
Drive in a 3 in.
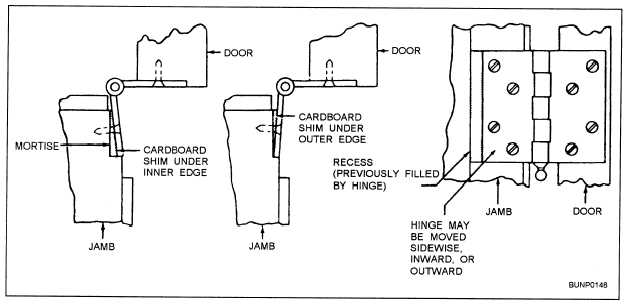
To readjust the door frame you have to remove the trim along the latch side to get at the shims.
Add or remove cardboard as needed to get the door straight.
This job can be a hassle especially if you have painted trim.
Remove appropriate hinge from door and jamb.
Hinge tweaker green dual standard heavy weight 134 and 180 gauge commercial door hinge adjustment tool hinge bender.
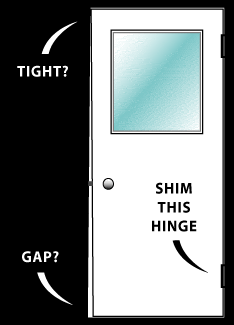
Gap along the latch side about the thickness of two quarters coins.
Remember that when the gap is adjusted on one side it affects the gap on the other side as well.
Unscrew and remove the bottom hinge from the door and the door jamb with a cordless screw gun.
It s likely that there s a larger gap at the bottom.
Screw with a drill.
When the screw is snug against the hinge give the screw another quarter turn with a screwdriver.
3 remove the screws from the correct hinge.
How to adjust cabinet door hinges kitchen and bathroom cabinet door hinges are really easy to adjust.
Close door and check the spacing at the top and latch side of the door.
How to shim a door hinge 1.
Check the vertical spacing between the door and the door jamb.
Repeat this process for each hinge on the unit.
Starting with the top hinge remove the hinge and add a steel shim between the leaf of the hinge and the door or frame.
If the door has three hinges remove the screws from the middle hinge as well.
Place three of the cardboard.
Place the butt end of a nailset between the hinge leaves up against the pin eyelet or hinge knuckle.
Slide the shim behind the hinge that needs the extra spacing then drive the screws back in tightly and check the operation of the door.
Steps to repair a skewed door.
With a small screwdriver you can adjust the door left and right back and forth and up and down as well.
Use two shims that are each half the thickness of those just used to minimize the gaps and allow the hinge leaf surfaces to remain flush with the rabbet and backset surfaces.
Place one side of the.
1 16 of 283 results for door hinge shims ez shim inc.
4 7 out of 5 stars 45.
Close the door to check the fit.
The installer should have adjusted the frame with shims to leave about a 1 8 in.
Determine which hinge must be shimmed to adjust door and create even spacing.
Hs400bp 4 quick align hinge shim two packs of 15 4 8 out of 5 stars 58.